
call us 24/7 1-800-738-WE-WIN
call us 24/7 1-800-738-WE-WIN
Serving All of Georgia, Florida, & Texas
How to Document Evidence for a Rideshare Accident Claim

Table of Contents
- Step 1: Secure the Scene and Call 911
- Step 2: Capture Time-Stamped Photos and Video for Your Rideshare Accident Claim
- Step 3: How to Get Your Georgia Police Report
- Step 4: How to Request Lyft Trip History and Uber Trip Logs
- Step 5: Documenting Personal Injury Damages and Medical Care
- Step 6: Collect Witness Statements and Third-Party Liability Evidence
- Step 7: Preserve Digital Evidence and Avoid Social Media Mistakes
- Frequently Asked Questions
Last Updated: September 11, 2026
Step 1: Secure the Scene and Call 911
A rideshare accident claim starts with two things: safety and an official record. Move to a safe location if you can, then call 911 and request police and medical response. Your health comes first, and the responding officer’s incident report becomes the backbone of your case.
How you document evidence for a rideshare accident claim begins here, in the first minutes after impact. This guide walks through each step, from the scene to the cloud.
Once you’re safe, do three things before you leave:
- Report the collision to the 911 dispatcher and note the time
- Ask the responding officer for the incident report number
- Keep the ride receipt and app confirmation on your phone
Many rideshare passengers don’t realize their driver’s personal auto policy often excludes commercial activity. That single detail reshapes who pays, and it’s why the police report matters so much.
Step 2: Capture Time-Stamped Photos and Video for Your Rideshare Accident Claim
Photographic evidence wins rideshare cases because it’s objective and immediate. Take wide shots first, then close-ups, and let your phone’s timestamp do the work. Most phones embed date, time, and GPS coordinates automatically in the photo’s metadata.
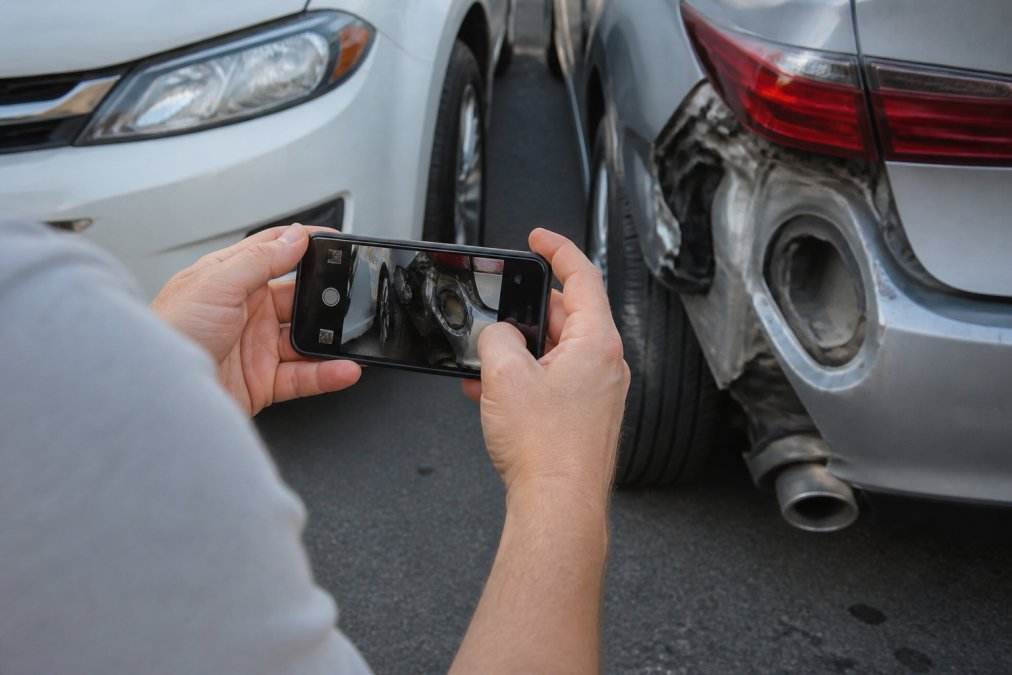
A common mistake is photographing only the damage. Capture the whole picture:
- Vehicle damage from multiple angles, including the other car’s plate
- Road conditions, traffic signals, and lane markings
- Your visible injuries and any torn clothing
- The rideshare app screen showing the trip in progress
Time-stamped photos and video give your attorney and the insurance adjuster a clear record of the accident scene that’s hard to dispute later.
Step 3: How to Get Your Georgia Police Report
A Georgia police report is the official record of your crash, and you can request it through the responding agency or the Georgia Department of Transportation’s crash report portal. You’ll typically need the incident number, the date, and the county where the crash occurred.
Georgia law requires drivers to report crashes involving injury, death, or significant property damage to the authorities. The Georgia Governor’s Office of Highway Safety crash reporting resources points victims toward the correct agency for their county.
Request the report as soon as it’s available, since processing takes time. Review it carefully once it arrives. Errors in the narrative, the driver’s status, or the injury description can be corrected, but only if you catch them early.
Step 4: How to Request Lyft Trip History and Uber Trip Logs
Trip logs are the digital backbone of a rideshare claim, and they are also the most perishable evidence you will handle. To request Lyft trip history or Uber trip logs, start inside the app, then escalate to a formal written data request. Both platforms retain the route, timestamps, driver identity, vehicle details, and fare, but the in-app view is a summary, not the full record, and it can change or disappear as the account refreshes.
Capture the in-app record first, before you do anything else.
- Open the app and screenshot the completed trip, including the map, the fare, and the trip ID.
- Screenshot the driver’s name, photo, rating, and vehicle make, model, and plate.
- Screenshot your ride receipt email and any push notification confirming the trip.
- Export or forward the receipt to a second email address you control, so a lost phone does not erase your only copy.
Then submit a formal data request. Uber routes these through its privacy portal and support channels; Lyft routes them through its support and privacy request process. Ask specifically for:
- The full trip manifest, including GPS breadcrumbs and the pickup and drop-off timestamps
- The driver’s status at the moment of the crash, en route to pickup, on trip, or between trips
- The driver’s account and vehicle records tied to that trip
- Any in-app communications, including messages and calls placed through the platform
Save the confirmation email or ticket number. That timestamp proves you asked, which matters if the platform’s response is slow or incomplete.
Why driver status is the whole ballgame. A rideshare accident claim often hinges on whether the driver was actively on a trip, waiting for a request, or off the app entirely. Most platforms maintain coverage during the on-trip period and a different, often lower, limit during the waiting-for-request period. Off-app driving is typically excluded altogether. The trip log is what pins down which window applied at the moment of impact. Uber’s official support page on trip and account data explains how riders can access their own trip records, and Lyft publishes a parallel process through its help center. (Source: Federal Motor Carrier Safety Administration (FMCSA) guidelines)
Preserve the data before the app refreshes it. Trip history views can roll off, and account changes can alter what you see. Download your full ride history from the account settings if the platform offers it, and store the export in cloud storage alongside your screenshots. A common pattern is for riders to discover weeks later that the in-app trip detail no longer shows the route, which is why the same-day screenshot and export matter more than the later formal request.
Step 5: Documenting Personal Injury Damages and Medical Care
Documenting personal injury damages means building a paper trail that connects your injuries to the crash. See a doctor promptly, even if you feel fine, and follow every treatment recommendation.
Keep records of:
- Emergency room and follow-up visit summaries
- Diagnostic imaging and lab results
- Prescriptions and medical bills
- A daily symptom log with dates and severity
Insurance adjusters look for gaps in treatment to argue your injuries weren’t serious. Consistency defeats that argument. If you miss work, keep pay stubs and an employer letter confirming lost wages. Georgia statute on the statute of limitations for personal injury actions sets the filing deadline, which is why delaying medical care can cost you twice.
Step 6: Collect Witness Statements and Third-Party Liability Evidence
Witness testimony can decide a disputed claim. Get names and phone numbers from anyone who saw the crash, including the other driver’s passengers and nearby pedestrians. Ask each witness to write down what they saw while it’s fresh.
Third-party liability evidence is the angle most victims overlook. A nearby business’s security camera, a city traffic camera, or a bystander’s dashcam footage can capture the collision from an angle your phone missed. Ask businesses near the scene to preserve their footage, and send a written request the same day. Many systems overwrite recordings within days.
Gather what you can:
- Witness contact details and short written statements
- Locations of nearby cameras and who owns them
- The other driver’s insurance and license information
- Any dashcam footage from your own or a nearby vehicle
Step 7: Preserve Digital Evidence and Avoid Social Media Mistakes
Evidence preservation means locking down your digital records before they vanish, degrade, or get misread. This is the step most guides skip, and it is where claims are quietly won or lost.
Cloud-based preservation. Upload every photo, video, screenshot, and document to a secure cloud folder the same day, and keep a second backup on a separate service or drive. Phones get lost, dropped in water, or wiped during repairs. A single device is a single point of failure for your entire case. Organize the folder by date and label each file with what it shows, “rear bumper, other vehicle plate, 4:12 p.m.”, so an adjuster or attorney can navigate it without you.
Metadata integrity. Every photo your phone takes carries embedded data, the date, time, GPS coordinates, and device information, commonly called EXIF data. That metadata is what turns a picture into proof of when and where it was taken. Two rules protect it:
- Never crop, filter, or edit the original file. Editing can strip or rewrite the metadata.
- Keep the originals untouched and make separate copies for any editing or annotation.
If you need to prove a photo’s location and time, the untouched original is the version that carries the proof. A cropped or filtered copy may still be useful visually, but it is far easier to challenge. If you are unsure whether a file still has its metadata, most phones and desktop photo apps let you view file details, and a qualified professional can extract and authenticate the data if the claim goes to litigation.
Social media is where strong claims go to die. Adjusters and defense attorneys review public profiles, and they are looking for anything that contradicts your injury claim. A post about “feeling great,” a check-in at the gym, a vacation photo, or a tagged picture from a night out can all be introduced as counter-evidence. The pattern is consistent: the post is taken out of context, and you spend the rest of the claim explaining it.
What to do:
- Stop posting about the crash, your injuries, your treatment, or your activities until the case resolves.
- Do not delete existing posts either. Deletion can look like spoliation of evidence and can be used against you.
- Tighten privacy settings, but assume nothing is truly private, screenshots travel.
- Ask friends and family not to tag you or post about the crash.
- If you must use social media, keep it entirely unrelated to the accident and your physical condition.
Keep the originals, not just the copies. Store the untouched photo and video files, the full trip-log export, the police report, and your medical records in the same cloud folder. Do not overwrite or reorganize originals once they are saved. If your phone is replaced, migrate the folder before wiping the old device.
Evidence Type | Where to Get It | How Long to Keep It |
|---|---|---|
Police report | Responding agency or state portal | Until case resolves |
Trip logs | Rideshare app or data request | Until case resolves |
Medical records | Providers and hospitals | Permanently |
Photos and video | Your phone, backed up to cloud | Permanently |
Witness statements | Collected at the scene | Until case resolves |
Frequently Asked Questions
What should I avoid saying when filing a car insurance claim?
Never admit fault or apologize at the scene, and avoid giving a recorded statement to the other driver’s insurance adjuster before speaking with an attorney. Statements like ‘I didn’t see them’ or ‘I’m sorry’ can be used to reduce your claim settlement. Stick to the facts: what happened, where, and when. If an adjuster calls, politely decline and say you will provide information through your lawyer. This protects your personal injury claim and prevents the insurance company from twisting your words.
What evidence do I need for a rideshare accident claim?
You need time-stamped photos of vehicle damage, road conditions, and any visible injuries; the police report or incident report; medical records and bills; the rideshare trip receipt or app screenshot showing the route, driver name, and fare; witness contact information; and any dashcam footage. For a rideshare accident claim, also request your trip history from the platform and preserve all digital evidence, including app activity and GPS data, before it expires from the app.
How do I obtain a police report for an accident in Georgia?
In Georgia, you can request a police report from the law enforcement agency that responded to the crash. For state patrol, use the Georgia Department of Public Safety’s online crash report portal. For local police or sheriff, visit the records division or submit a written request. There is usually a small fee, and reports are typically available within a few business days. Having the report number helps your attorney request the full incident report and any accompanying notes.
Why is the rideshare app trip receipt important for an injury claim?
The trip receipt is crucial because it proves you were a paying passenger in a rideshare vehicle at the time of the crash. It shows the driver’s name, the vehicle description, the route history, and the fare. This evidence establishes liability and helps identify the correct insurance policy. For a Lyft or Uber accident, the company’s $1 million commercial liability coverage may apply, but you must prove you were on an active trip. Screenshot the receipt immediately; the app may remove trip details after a short period.
A rideshare crash leaves you juggling medical care, missed work, and an insurer that’s already building its defense. Merritt & Merritt Law Firm has represented injury victims for over 45 years, offering 24-hour service and visits to your home, office, or hospital. With a contingency fee structure, you pay only if we win. Schedule a free consultation and let our team investigate your claim and hold the liable parties accountable.
Our Locations

Atlanta/Decatur
1 West Court Square
Suite 750
Decatur, GA 30030

Savannah
100 Bull Street
Suite 200
Savannah, GA 31401

Statesboro
15 West Main Street
Statesboro, GA 30458
Houston
1415 Louisiana Street,
Suite 1800,
Houston, TX 77002

Jacksonville
841 Prudential Drive
12th Floor
Jacksonville, FL 32207

Contact Us
© Copyright 2026 Merritt & Merritt Law Firm. All rights reserved.